Tips & Tricks | Backing up your camera settings image

Tips & Tricks | Backing up your camera settings

What’s the advantage of backing up your camera settings? Modern cameras offer more customisation than ever, and if you spend a lot of time using yours, you’ll likely fiddle with things to get them the way you want them.

Whether it’s to do with picture modes, white-balance settings, Fn keys, exposure compensation or whatever else, you’ll likely find ways to get your camera working exactly how you want it to for a streamlined shoot. However, if you reset your camera without saving these settings in some way, you may boot it up to find everything permanently restored to defaults. If you’ve spent months or even years working with your camera and can’t necessarily remember everything you set up, this could be a major pain!

Fortunately, many camera manufacturers include in their products the option to save and load settings. With a few taps through the menu, you can access the option to save settings to an SD card, or load them from one. This is a great thing to do with an old card that you don’t use too much anymore – indeed if your camera has multiple card slots, you can quickly accomplish this without even taking a break from your shoot!

Backing up camera settings has never been easier, and takes just a few minutes. While it’s always going to vary from model to model, we’ll run through where you’ll likely find the option for each major manufacturer.


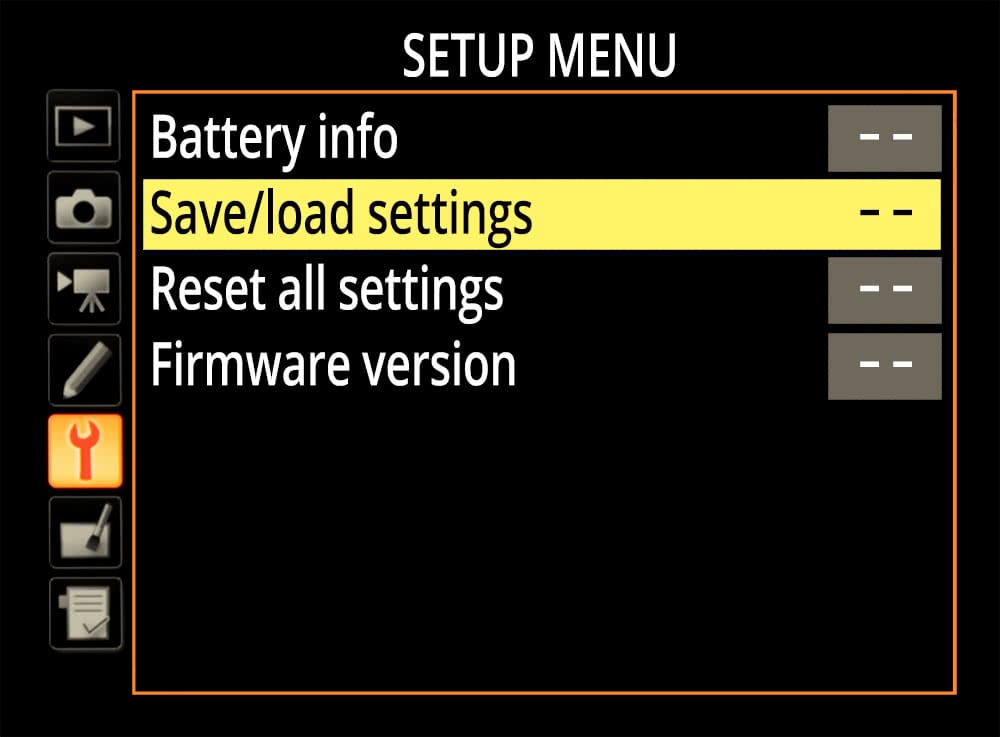
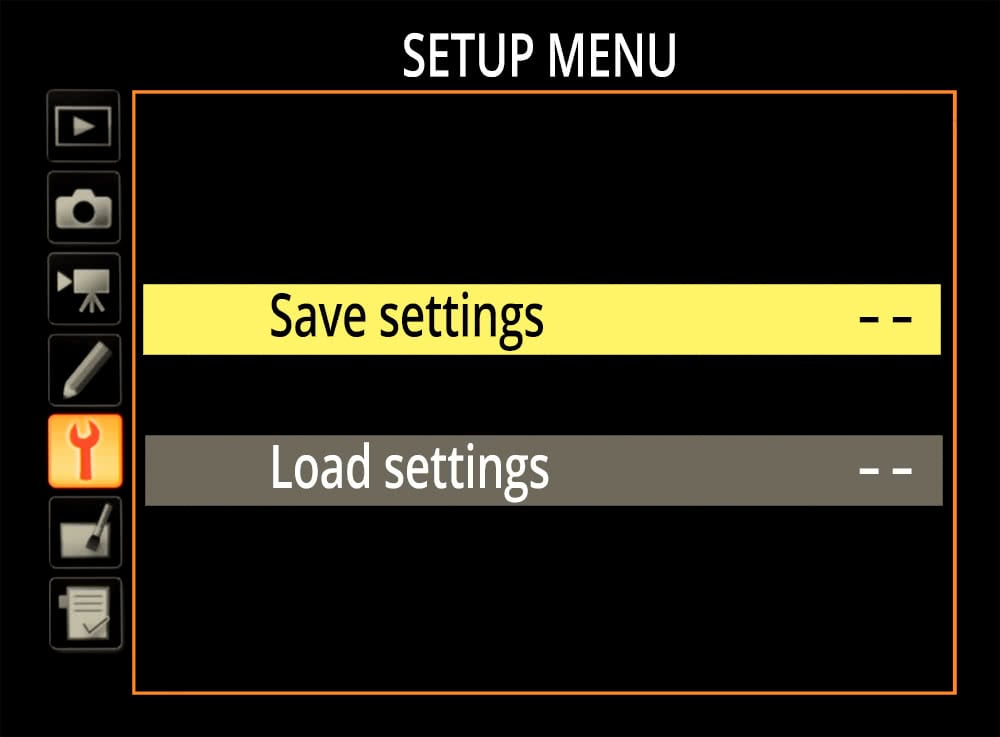
Save camera settings for Nikon

With most Nikon DSLRs, the option is found under the Setup menu. Simply select the option and then choose to either Save or Load your settings.


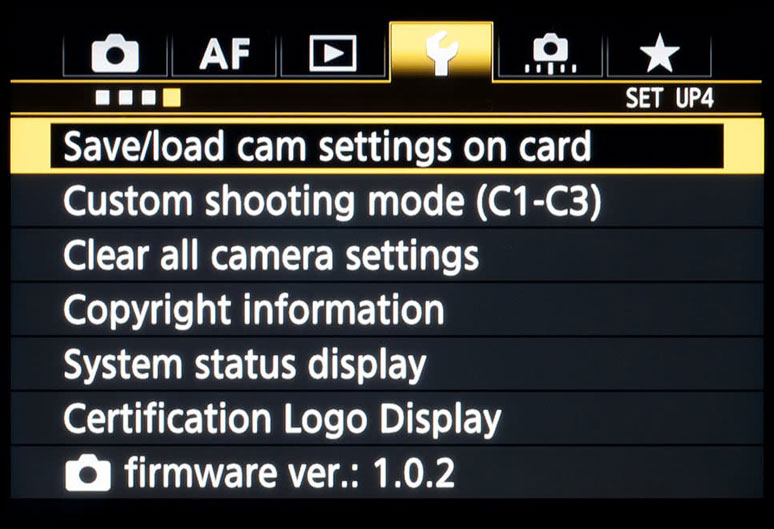
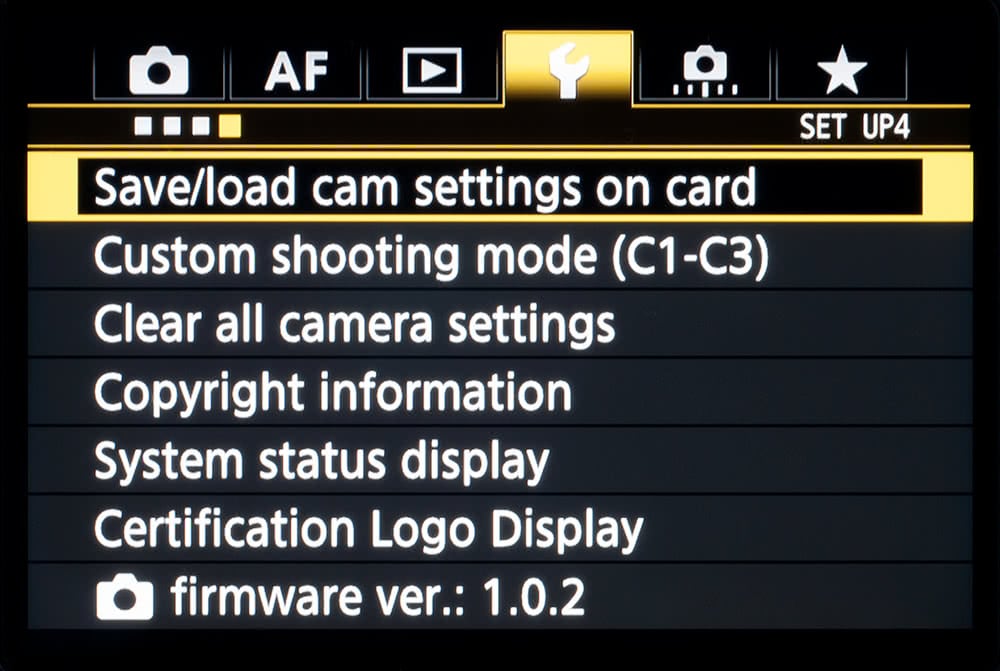
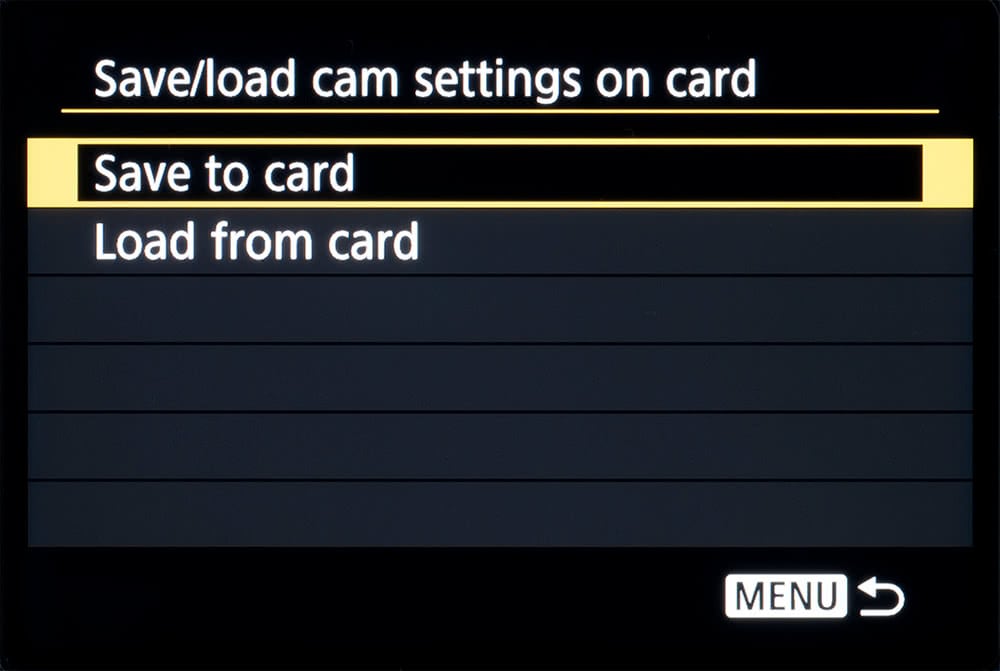
Save camera settings for Canon

With most Canon DSLRs, the option is also found under the Setup menu. Simply select the option and then choose to either Save or Load your settings.


Save camera settings for Sony

Once your camera is set up the way you want it, hit the Menu button. On the camera tab, select “Memory”. From here you can press the left and right buttons to select the location to save your settings. You can select 1, 2, or 3 for your camera’s internal memory, but if you really want to be safe, select M1, M2, M3, or M4 to save on your memory card.

Bear in mind that this will only save settings for the mode you’re in – Program, Manual, Aperture Priority etc. If you habitually shoot in multiple modes, you’ll want to save profiles for each one.


Save camera settings for Fujifilm

Modern Fujifilm cameras let you create up to seven different shooting profiles of saved settings. Press the MENU OK button, and navigate to IMAGE QUALITY SETTING. Select EDIT/SAVE CUSTOM SETTING and press MENU OK – this will bring up the seven custom settings.

The next step varies depending on your model of camera, but you should be able to select one of these profiles and hit SAVE CURRENT SETTINGS to record your camera’s current status.

However, this will only save the profile internally. If you want a backup of your camera settings,  the best thing to do is download the Fujifilm X Acquire software for Windows or Mac. Download and install the software, then plug in your camera via USB.

Click the Fujifilm X Acquire icon in the menu bar (Mac) or taskbar (Windows), and you should see options to BACKUP CAMERA SETTINGS or RESTORE CAMERA SETTINGS.


Save camera settings for Panasonic

Panasonic cameras have a useful function that lets you use the Bluetooth connection to save your camera settings to a smartphone.

Connect the camera to your smartphone via Bluetooth. Tap Home, and then the wrench icon to get to Camera Settings Copy. Tap Save Setting – you may get a confirmation box at this point. Tap the Yes icon, and you’ll be good to go.

This mode also lets you transfer settings from one camera to another, which can be especially useful if you’re on a video shoot with multiple cameras and want to ensure things remain consistent.


Save camera settings for Olympus

Olympus cameras do not currently offer an easy, straightforward way to externally save your camera settings. There is a CUSTOM RESET function that lets you save profiles in-camera, which can be found in the first tab of the menu (camera icon).

In this section, you’ll see RESET 1 and RESET 2 options – these are custom reset profiles, which allow you to save specific settings and call them up at a moment’s notice.

IF your camera unexpectedly dies, a trip to a repair shop can be a lifesaver. At Fixation’s centres in London and Manchester we will always endeavour to diagnose the problem and fix it quickly to get your camera working again.

However, some issues with digital cameras will necessitate a full factory reset. If that happens, it pays to have your preferred settings backed up, whether to a memory card, a smartphone or the cloud. Taking the time to understand how to externally save and load your camera settings could pay dividends in the long run, and save you a major headache!

Alternatively, if your camera proves to be truly beyond repair, then it may be time to get a new one. Having your settings saved and ready to be restored can be a great way to hit the ground running with your new machine. While this will be easiest if you buy an identical body, settings can also potentially be imported between different models from the same manufacturer. Either way, it’s best to always be safe and back up your preferred settings regularly, ensuring that the latest versions of your settings are saved.

NB. If you update your camera’s firmware, you generally can’t restore your settings, as new features may have been added to your camera, so useful as it is, it’s not unfortunately foolproof!

Also, bear in mind that any firmware update will generally reset your customisation options.

Tips & Tricks | Keep your camera bag clean image

Tips & Tricks | Keep your camera bag clean

When was the last time you cleaned your camera bag? A camera bag may seem unimportant, but it’s vital for protecting your valuable cameras and lenses. A good camera bag will be glued to a photographer’s hip on every trip, making their life easier and more manageable.

But what happens when the edges start to fray, the smell starts to build and the dust starts to accumulate? This is not only unpleasant, but also has the potential to damage your equipment. And that’s why you need to be cleaning your camera bag.

Ideally, you should do regular small cleans, and a deep clean every few months. In this blog we’ll quickly run through the best ways to do this.

We see a lot of bags as dusty as this one!

Regular small cleans

First, it’s important to note that anytime you spill something on your bag, you should make sure to give it a quick wipe with a chemical-free and fragrance-free wet wipe or cloth. This will only take a few seconds, and will save you a lot more hassle later on by preventing the stain from settling in.

It’s up to you how often you do a small clean. It depends how often you’re using your bag, where you’re taking it and what kind of surroundings it’s being left in. If you’re doing daily trips to a sandy beach then it will probably need to be cleaned more often than if you’re going to the studio once a week. But we would recommend once every couple of outings.

First, remove everything from your bag (including the partitions!) and place all the contents in a safe space. We wouldn’t want that camera or lenses to be damaged on their adventure out of the bag.

Grab the vacuum cleaner and give the bag a good hoover all over, getting right into those dark and dusty corners. A lot of dust may have gathered in different pockets, so remember to open up any zippers and compartments and hoover inside those too.

If you don’t have a suitable hoover, then you can use a dry cleaning brush to dislodge any dirt and tip it out into a bin.

Your bag is now looking suitable for its next outing!

The big clean

As mentioned earlier, it’s optimal to do the deep clean of a bag every few months – maybe more often if you make frequent trips. But how best to go about deep cleaning your camera bag?

You may have heard that dumping your camera bag in the washing machine may do the job. But be careful! This may have a detrimental effect on your bag, or simply take forever to dry. It depends on the material of your bag. If a bag takes too long to dry, it increases the possibility of mould starting to form. If that happens, you’ll definitely be shopping for a new bag!

Specifics of cleaning can depend on the material – a nylon or cotton bag will need to be cleaned differently from a leather bag, for instance. However, a universally safe option – one that isn’t too strong and won’t do any damage – is to use warm, soapy water.

Again, do your quick clean. Empty your bag and vacuum the inside, use a cloth to brush away the dirt on the outside.

Mix some soap and warm water. Using a small cleaning brush (alternatively, a clean toothbrush), slowly go around the inside and outside of your bag, coating it with the soapy water mixture. Make sure to give extra attention to any stains or blemishes, and don’t forget to give any zippers a good clean too.

The next step is to use some clean warm water to wash away the soap. So repeat the previous step but with clean water. Clean any straps, handles and partitions with the same method.

When this is done, leave your camera bag in a safe, open place to air dry. Leave it open to prevent mustiness or any mould building up inside. Once it’s fully dry you can place the partitions back inside. That’s your deep clean done!

Lastly, here are a few bonus tips. Make sure you keep on top of trimming any loose threads! Not only do these look untidy, but they can also caught in the zippers. Also, get a rain cover for your bag! This won’t help in just protecting it from the rain, but may also protect it slightly from becoming dirty.

Key points

Do

  • Regularly wipe the outside and vacuum the inside of your camera bag.
  • Brush away the dirt on the outside of your bag with a cloth.
  • Use soapy water and clean warm water to give your bag a deep clean.
  • Remember to clean the zippers and trim any loose threads to keep your bag in good condition.

Don’t

  • Put your bag in the washing machine!
  • Use any strong detergent.
  • Soak your bag.
Tips & Tricks | Take care with memory cards

Tips & Tricks | Take care with memory cards

We’ve all been in that situation – your memory card is full and you have to quickly change cards without thinking.

CompactFlash cards in particular have an awkward knack of almost fitting in the camera if inserted back to front, or even sideways, and the damage this can do is severe; the pins that interface with the card are easily bent, and once this happens, the CF reader unit needs to be replaced.

This D700 shows how easy it is to insert a card the wrong way.

We see cameras come in every week with bent pins and as well as the inconvenience of being without your camera for a few days while we replace the CF reader, the cost can be upwards of £150.

You only need to bend one pin to render your camera’s card reader unusable.

It’s also worth keeping a close eye on the card itself. If any of the holes on the card’s access port are blocked, this can also result in bent pins – even if the card is inserted carefully. And damage to the plastic sheath around the holes can also cause problems when the card is inserted.

If your cards look like this, it’s time to replace them!.

So next time you’re organising your kit for a shoot, take a minute to inspect your cards using a loupe and remember to double check before you insert them in the camera. It could save you a small fortune.


Hi, how can we help?