Why I use flash outside?
The majority of my work is outside and generally involves people. I always want scenes to look naturally lit, but often need to capture enough detail to sell a brand or product. Although cameras are getting incredibly advanced, they are still not able to capture anywhere near the same dynamic range as the human eye. This is not only true for colours but also capturing detail in shadows and highlights. We use flash on shoots to enhance the light on a subject enough to replicate what you would see with the human eye.
Define your style
There are a huge variety of possible techniques behind lighting an image, but they must be driven by the style that you would like to achieve. The first step is to decide if you want your work to look like it has been lit artificially or not? When you light an image dramatically there is a certain amount of artistic licence, whereas lighting to mimic natural light is more a case of problem-solving to make it appear real. Everything I will discuss is relevant to my style of work, but that is by no means to say that is the only way to light a scene, it is just what works for the images I create. Regardless of style, you need to follow a few rules to ensure your work doesn’t jar the eye of the viewer and look unnatural.
Lighting Position
Before I reach for any lights, I always start by looking at the scene without a camera and working out, what the main source of ambient light is and how is it falling on the subject?
Unless we are shooting at night it is generally the sun. This means the main source of light (or key light) will almost always be the sun, even if it is diffused behind a cloud. This shapes the entire scene and the only reason to use additional lights is to enhance power and fill in the gaps where light from the sun is missing. Once the direction is decided, I will determine if the light from the sun is bright enough. Living in England the answer is usually no. If this is the case, we will place our key light so the light falls in the same direction as the sunlight. Below is a diagram of how this might look.

Fill in flash
Once you have your main light sorted it’s time to address the gaps. Here the main issue would be the model’s face. While it is tempting to place a flash facing the opposite direction to the sun, you have to remember what the human eye would see. It is natural for the face to be in shadow if the sun is behind, so that is what we need to mimic. It is common to see photos where the model appears to be cut out from the background. This is usually due to an overpowered or poorly placed fill flash.
In this scenario, I would imagine the sun wrapping around the camera right of the model’s face, so I would place the fill flash like the diagram below. Once the position of the flash is good it is a case of adjusting the power to ensure it compliments but doesn’t overpower the key light.

Quality of light
Once you have figured out the direction of your light, it is crucial to decide whether the light is hard or soft. The light quality of the sun is determined by its height in the sky and whether it covered by cloud. You can tell the quality of light best by looking at shadows. A bare, midday sun will give crisp hard shadows and as that sun sets or goes behind a cloud the shadows will get softer and the edges will be more diffused.
Modifiers
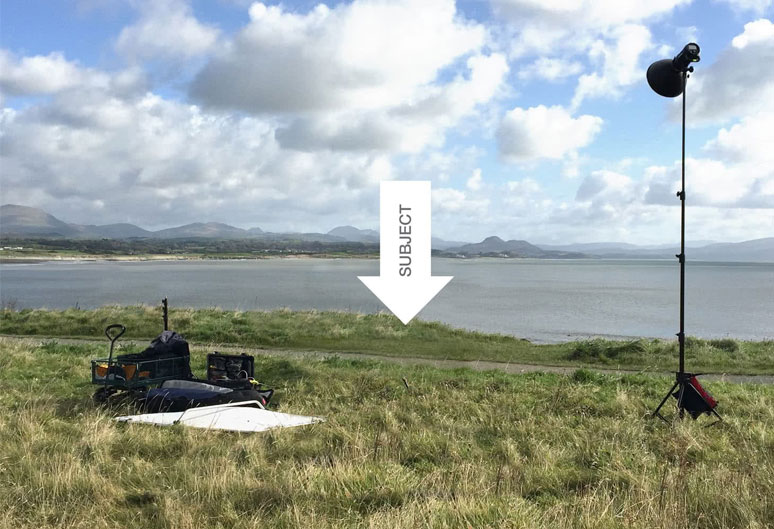
Modifiers are used to take artificial light and shape it. This can be to enhance or flatter certain aspects of your subject or to mimic a type of light as described above. The size of the modifier relative to the subject is what defines how hard or soft the light is. You can only pick a modifier once you know the type of light you are trying to create. A large softbox close to the subject will create light similar to a diffused sky, while a small source like a magnum reflector will create a crisp, hard light similar to direct sunlight. With this in mind, a 3ft softbox right next to your subjects face will give a soft flattering light, however, the same softbox 10ft away from the subject will give a hard light because the relative size is much smaller. Below is a photo showing how we used a magnum reflector up high and far back from the subject to mimic direct sunlight and fill in a few shadows that were not lit by the sun which was over the horizon to camera right.

Types of flash
There are a huge variety of options available now, but the first thing to decide is what you will be using your lighting kit for. Do you need speed, power, portability or all three?
You can either go for monoblocs where the flash is one unit or heads and packs which have a power supply with a lead to a head containing the bulb.
If you work on location I suggest lithium powered units. I use a Profoto system and the B1’s on location. For a more economical and portable solution, speedlights make really good cheap and portable lighting kits and this is how I started out. The sacrifice with traditional speedlights is recycle speed and power, however, this is improving all the time with new technology. Don’t feel like you have to buy all of your lights straight away. Renting is a great way to figure out what works best for you and monoblocs especially are very reasonable to hire for the day.
Alternatives to flash
If flash is not an option you can use one or multiple reflectors in the same way as mentioned above to give you a similar look. The main constraint here is that you can’t increase the ambient light, you can just shape it, so it works best in brighter situations.
The final option is using constant light, the same as used in video shoots. These come in a variety of options from small LED panels to huge HMIs. We often use a single large HMI to replicate the sun and then use white reflectors to add light and black ones to take light away and give the subject more shape.
I hope you found this small insight into the world of lighting helpful. It was really hard just touching the surface on such a huge topic but make sure to have a look at www.jackterry.co.uk/journal for more tips and a look behind the scenes of some of our shoots.