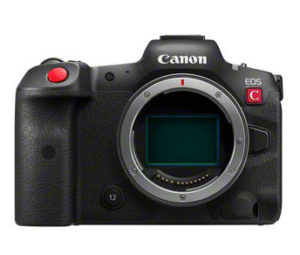
With just one compact body you can capture 8K video or 45 megapixel photographs. From Canon Cinema EOS the EOS R5 C is a video version of the popular EOS R5 full-frame 35mm mirrorless camera body with a boosted video spec and some important physical differences which make it an 8K video powerhouse.
Canon EOS R5 C: £4,499
The EOS R5 C is available to pre-order just contact our sales team on sales@fixationuk.com or call us on 0207 582 3294.
Enhanced video performance
The EOS R5 C can capture 8K 30fps or 8K 60fps with an external power supply. It can also record oversampled 4K, slow-motion 4K up to 120fps, as well as Full HD. Beyond this range of resolutions and frame rates the camera is capable of recording in a range of professional recording formats: three versions of Cinema RAW light recorded in-camera, XF-AVC, MP4 and RAW output via HDMI to an external recorder.
Active cooling means the EOS R5 C will shoot for long periods without cut off, more on this point below.
When setting up to shoot shooting you can choose to record into profiles which offer greater latitude in post production: Canon Log 3, HLG (Hybrid Log Gamma) which allows for delivery to SDR and HDR monitors, and PQ a dedicated HDR transfer mode.
When shooting, Cinema EOS tools such as waveform monitoring and false colour views are available to help you get the perfect take.
High resolution 45 megapixel photography & EOS R system features
The sensor, as seen in the incredibly popular Canon EOS R5, captures incredible high definition images with stills burst speeds up to 20fps. Dual Pixel CMOS autofocus delivers accurate and fast subject tracking with reliable Face, Head and Eye tracking, maintaining focus even when your subject turns away from the camera. The Dual Pixel Focus guide even delivers precise focus feedback when manually focusing.
Built in WiFi lets you transfer photographs wirelessly to a phone or computer – without the need for an extra accessory.
The RF lens mount on the EOS R5 C is fully compatible with the growing RF lens range as well as the EF-EOS R mount adaptors which open up the camera to use with the complete EF lens range for Canon DSLR cameras including tilt-shift and super-macro specialist lenses.
The big difference between the EOS R5 and the EOS R5 C
How has Canon done it? How have they added such a strong video recording spec to the EOS R5 C? Why didn’t they bring all this out with the original EOS R5?
The answer to all these questions is Heat, no, not the 1995 impressive but also somewhat impenetrable crime classic. Heat generated by a sensor recording and a processor processing 8K video for extended durations has limited what Canon could previously deliver in a body designed for photography. Heat management is much more critical for video cameras with an always-on sensor constantly demanding processing power compared with a stills camera which is only capturing and processing image information for a fraction of a second.
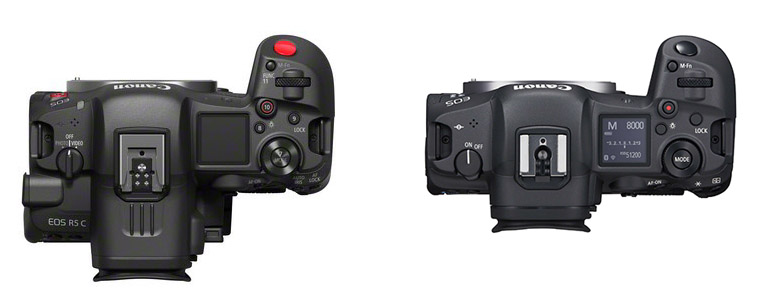
Canon have handled the heat generated by this video operation by adding an active cooling system (a fan to you and me) which cools a heat sink pulling heat away from the internal operations of the camera. The result is a thicker body behind the LCD and a longer hot-shoe and eyepiece compared to the original EOS R5 body. The right-hand grip is the same dimensions so hand-holding the camera will be just as comfortable as the EOS R5. This physical difference is most notable from a top-down view of the two bodies side by side:
The other change which we think is related to the cooling system is that the sensor has no IBIS stabilisation system, the sensor is static in the body. Canon announced that there is a 5-axis electronic stabilisation which will compliment optical image stabilisation in their IS lenses. Electronic stabilisation uses pixels surrounding the frame as a buffer to compensate for camera movement so can cause some cropping.
In the Cinema EOS lineup this camera is the smallest and lightest and the most like a Canon stills camera making the move to a professional video ecosystem easier for any Canon photographer being asked for more video content. For experienced Cinema EOS users the EOS 5R C offers a body that can deliver both the video performance they expect and a strong option for photography without the need to invest in a second system.
For more information or to pre-order the camera contact our sales team on sales@fixationuk.com or call us on 0207 582 3294.