Image stabilisation is a common feature on modern lenses, giving up to 4 stops advantage, and we’ve all enjoyed the benefits in those tricky low light situations where we don’t want to push the ISO too far.
The principle behind the technology is similar, regardless of manufacturer. A group of floating elements positioned near the rear of the lens are held in place by a series of electro-magnetic coils. Two gyroscopic sensors detect horizontal and vertical movements, and corrective adjustments are relayed to the electro-magnets which in turn steady the floating elements, resulting in a much sharper and steadier image.
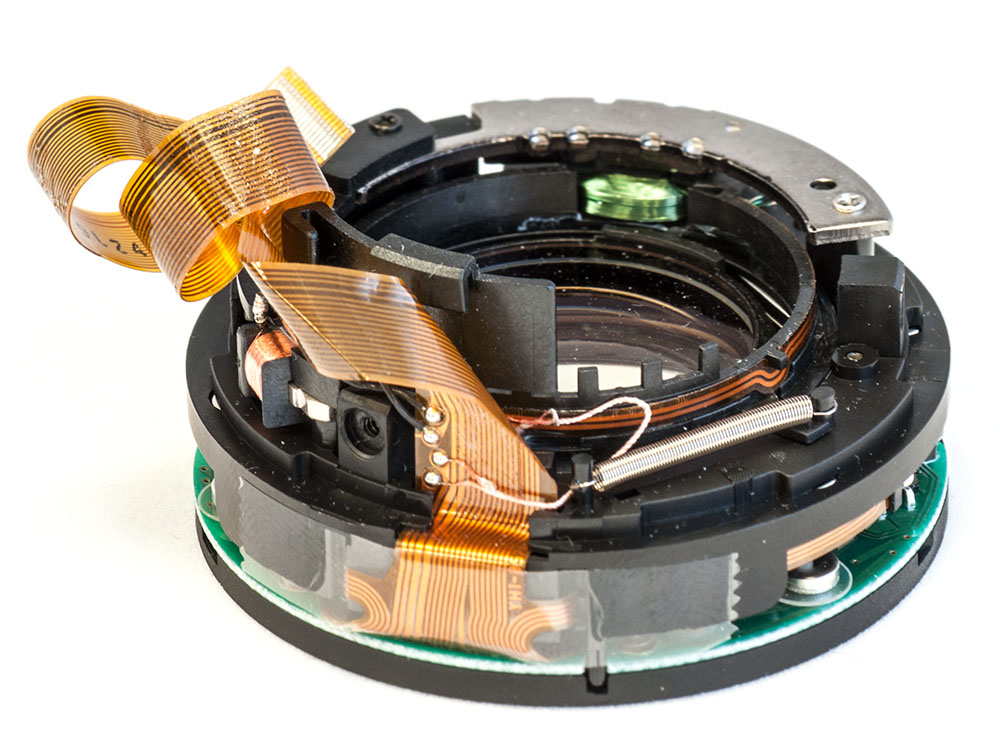
The IS unit from a Canon 100-400mm ƒ/4.5-5.6L IS lens.
Now with all this electronic technology sitting in the lens – effectively a mini computer – it goes without saying that care should be taken with your glass, especially as the stabilisation systems can be easily damaged if care isn’t taken when removing the lens.
When the lens is attached to the camera and powered on, the electro-magnets release the elements, ready to stabilise the shot once the AF is activated. But when the camera is turned off, the power to the electro-magnets is deactivated and the elements lock in place to minimise any damage if the lens is knocked.
However, if the lens is removed before the elements have a chance to lock, they can float around freely and are susceptible to damage. The golden rule here is to ensure the camera is turned off and wait a couple of seconds to allow the elements to lock before removing the lens. On some lenses an audible click can also be heard when locking.
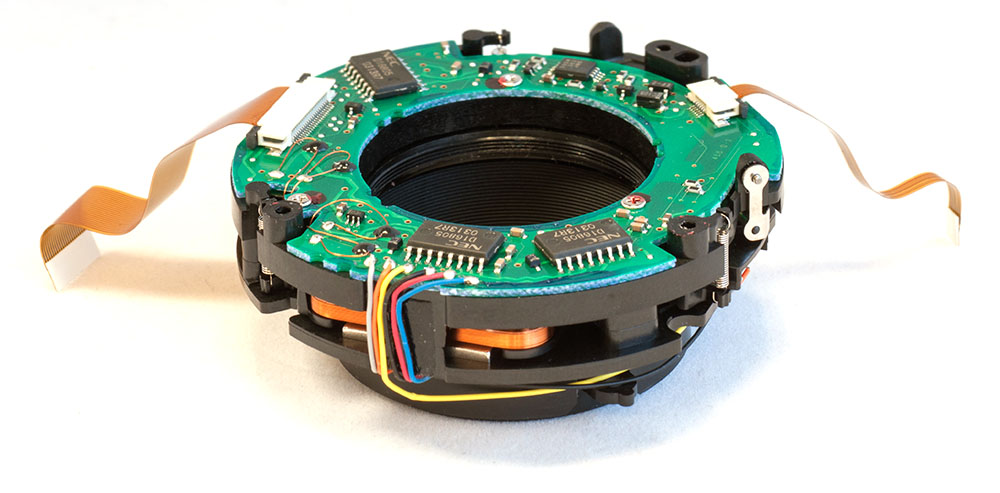
In some Nikkor lenses, the VR unit can be replaced without having to replace the floating element group. This example is from a 70-200mm ƒ/2.8G (1st Gen).
Lenses with damaged stabilisation units are something we see every week in the workshop and replacing these units can run into several hundred pounds, depending on the lens.
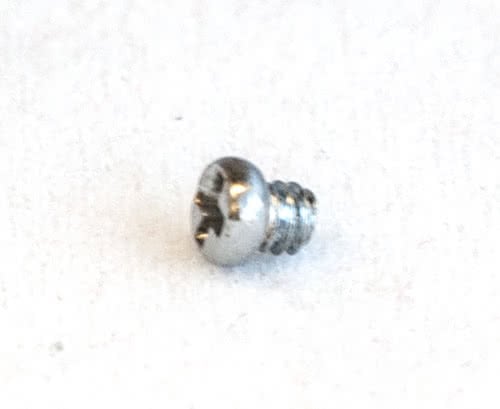
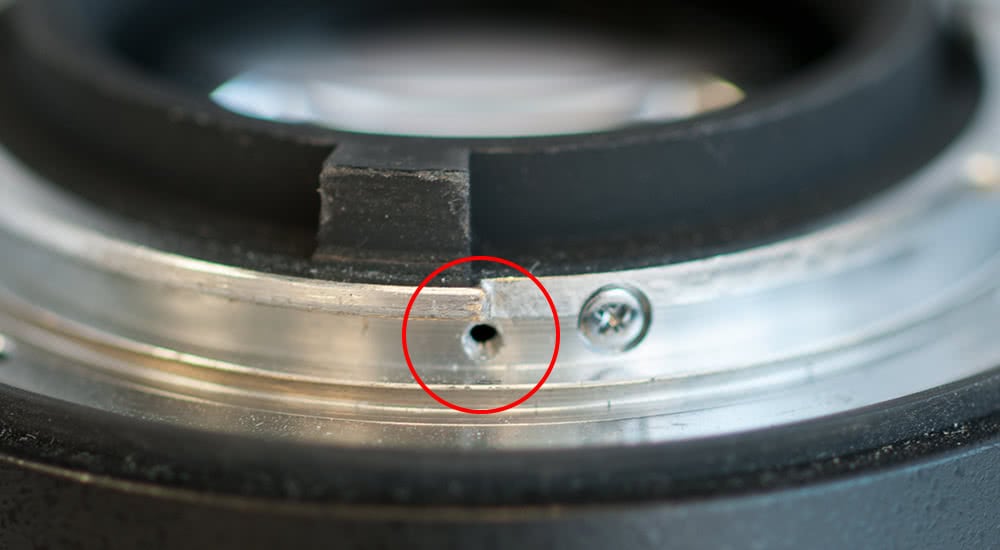
Here’s a useful tip for Nikon users: You see this screw? This 2mm screw that can be found tucked on the side of the bayonet on all Nikkor lenses? Well, if it falls off it can cause a lot of expensive damage!
It’s designed to stop the lens from over-turning when it’s being attached to the camera, and occasionally these screws have a tendency to work loose and fall out.
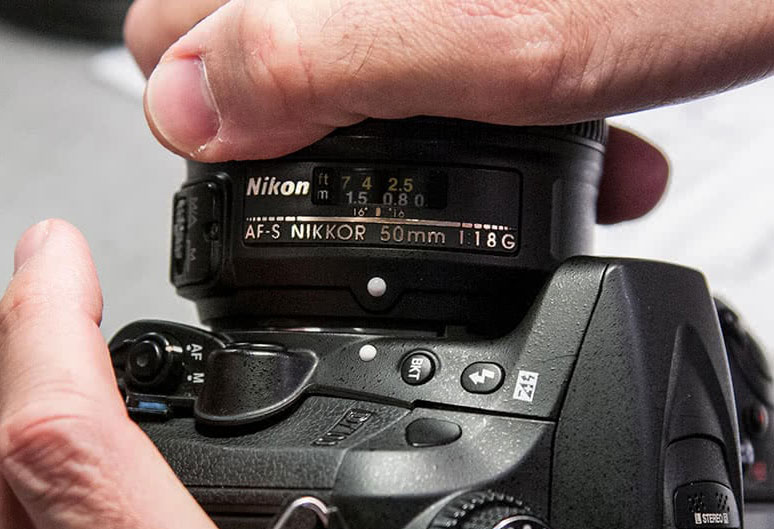
A Nikkor 50mm ƒ/1.4G with the screw missing
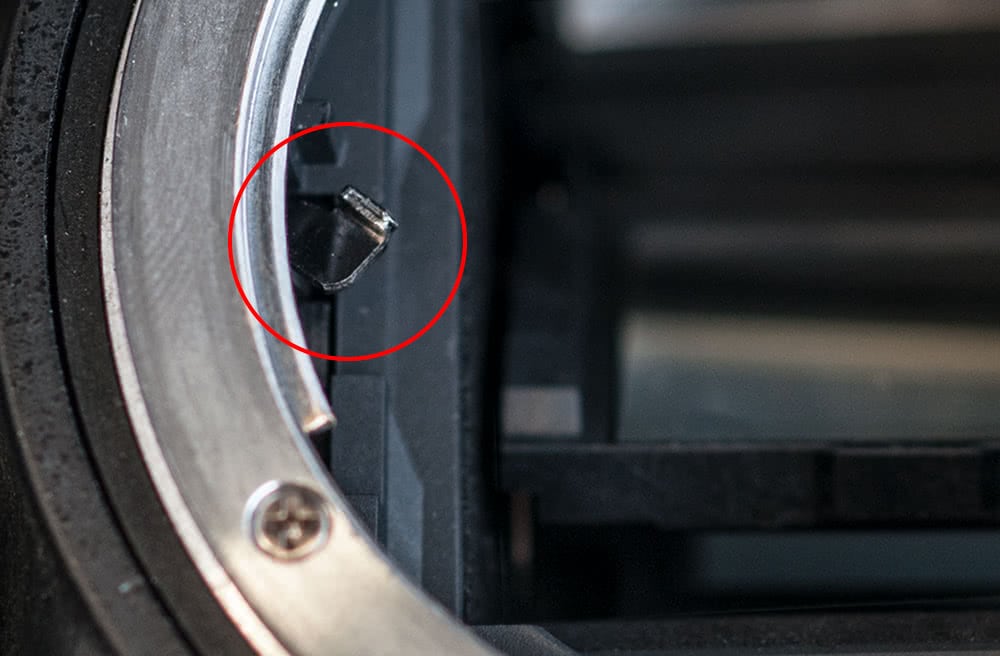
Its actual role is to physically stop the lens from being rotated too far when being mounted. If this happens, you’ll invariably feel a horrible grinding and the aperture coupling lever will become distorted. And of course, when you realise your mistake, the lever will get bent a second time as you attempt to remove the lens. A bent lever have an adverse effect on the camera’s ability to stop the lens down correctly at the time of exposure and can also cause any other lenses to jam as you attempt to attach them.
A D7100 with a bent lever. In normal conditions, the end of the lever would be straight
Correct lens mounting
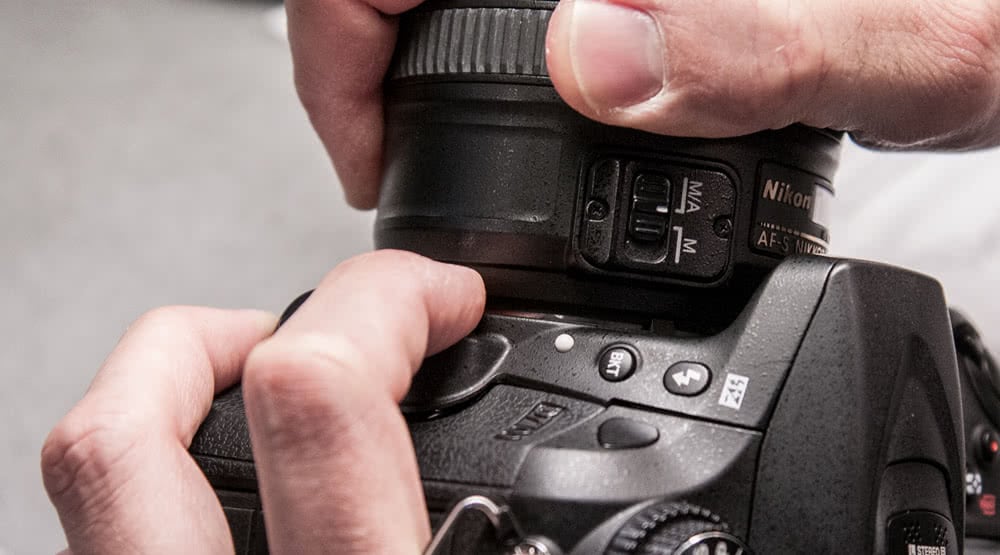
Aside from checking your lenses regularly to see if the screw is still present, another way to avoid damaging the control lever is to actually mount the lenses in the correct manner: there is no need to depress the lens release button when mounting a lens; it only needs to be depressed when removing a lens. Even if the stop screw has fallen off your lens, it is impossible to over turn the lens as it will lock into place via the release button pin. You’ll hear a click when the lens has mounted. However, the number of damaged cameras we see arriving at our workshop suggest that there are many Nikon users out there who insist on incorrectly depressing the button when mounting a lens. Just don’t!
The correct way to mount a NIkkor lens WITHOUT depressing the release lever
You’re asking for trouble if you mount your lenses this way!
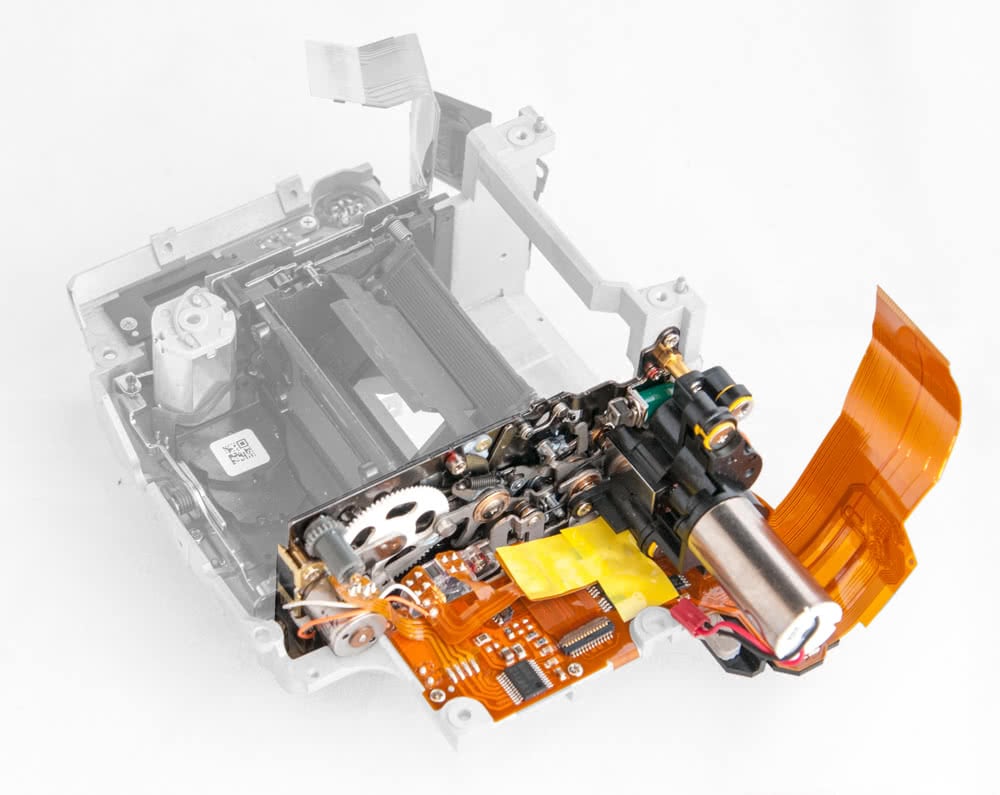
Repairing a bent lever
In some cases our technicians can gently bend the lever back into shape, but they’re made of an alloy and will weaken considerably if they’re pulled around too much. In the majority of cases, the lever mechanism will need replacing and it’s quite an involved job. It’s mounted to the side of the mirror box and the camera has to be stripped down. And even though the lever is a small part, it is attached to a much larger mechanism that needs to be replaced in its entirety.
The replacement lever mechanism from a D800
It can cost upwards of £250 to replace the parts, so take a couple of minutes every month to check your lenses and keep your finger off that button!
What’s the advantage of backing up your camera settings? Modern cameras offer more customisation than ever, and if you spend a lot of time using yours, you’ll likely fiddle with things to get them the way you want them.
Whether it’s to do with picture modes, white-balance settings, Fn keys, exposure compensation or whatever else, you’ll likely find ways to get your camera working exactly how you want it to for a streamlined shoot. However, if you reset your camera without saving these settings in some way, you may boot it up to find everything permanently restored to defaults. If you’ve spent months or even years working with your camera and can’t necessarily remember everything you set up, this could be a major pain!
Fortunately, many camera manufacturers include in their products the option to save and load settings. With a few taps through the menu, you can access the option to save settings to an SD card, or load them from one. This is a great thing to do with an old card that you don’t use too much anymore – indeed if your camera has multiple card slots, you can quickly accomplish this without even taking a break from your shoot!
Backing up camera settings has never been easier, and takes just a few minutes. While it’s always going to vary from model to model, we’ll run through where you’ll likely find the option for each major manufacturer.
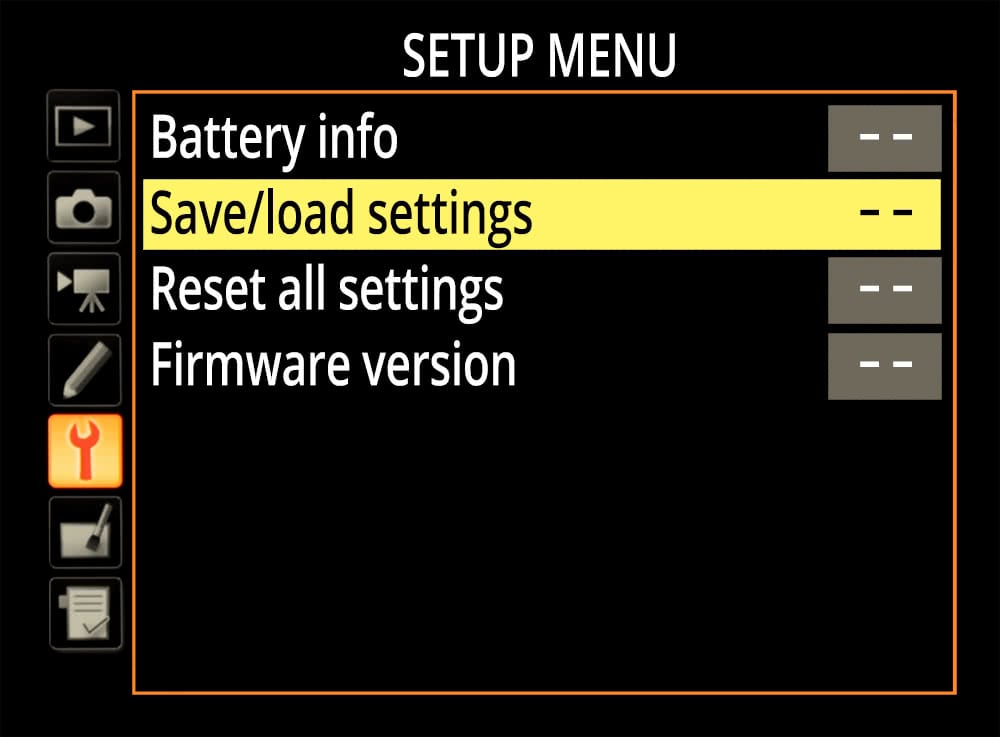
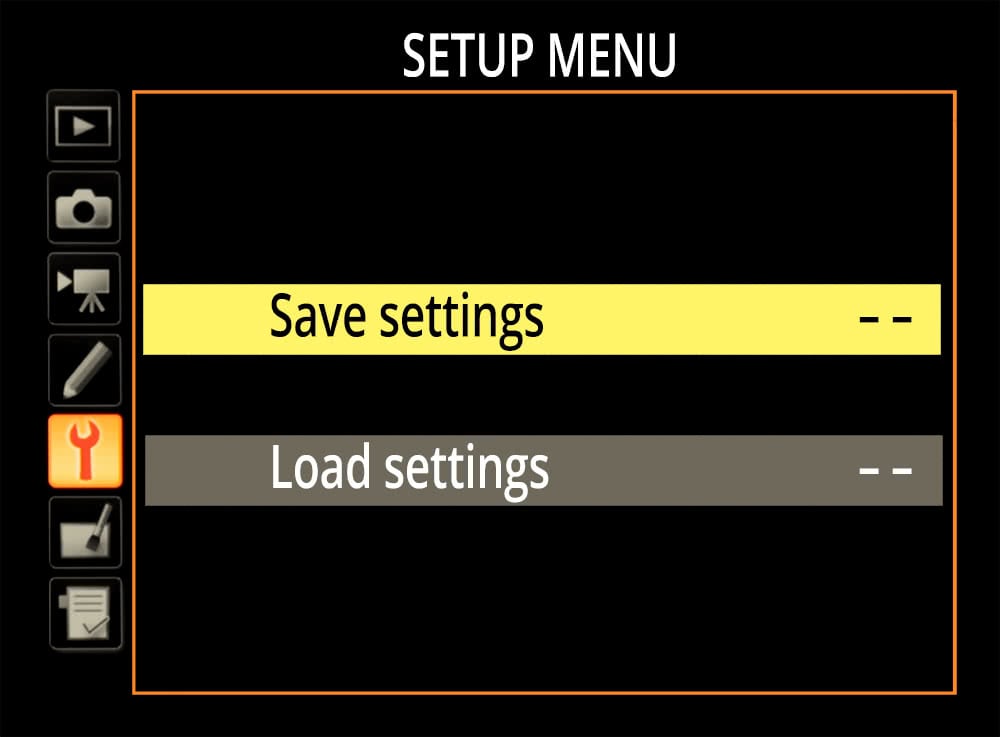
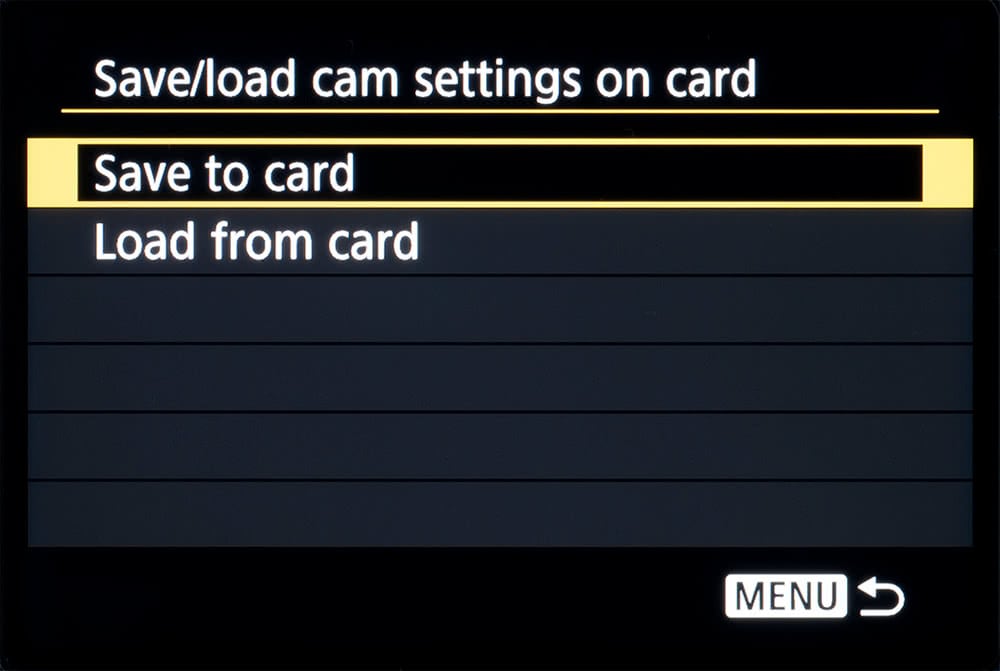
Save camera settings for Nikon
With most Nikon DSLRs, the option is found under the Setup menu. Simply select the option and then choose to either Save or Load your settings.
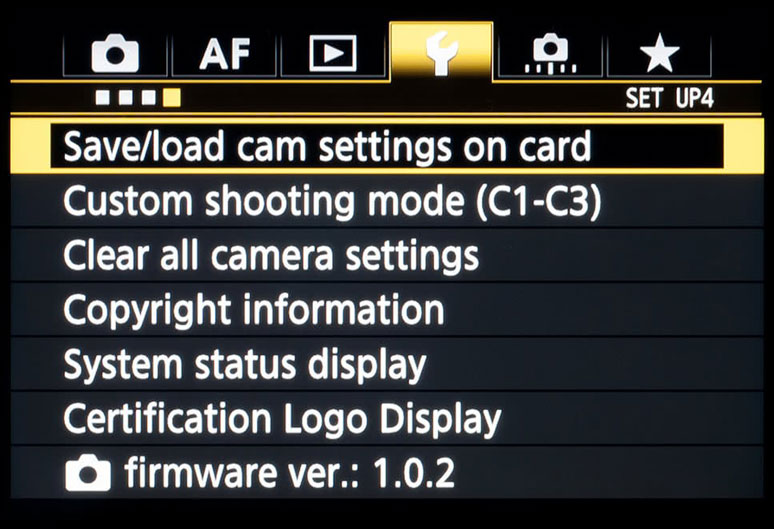
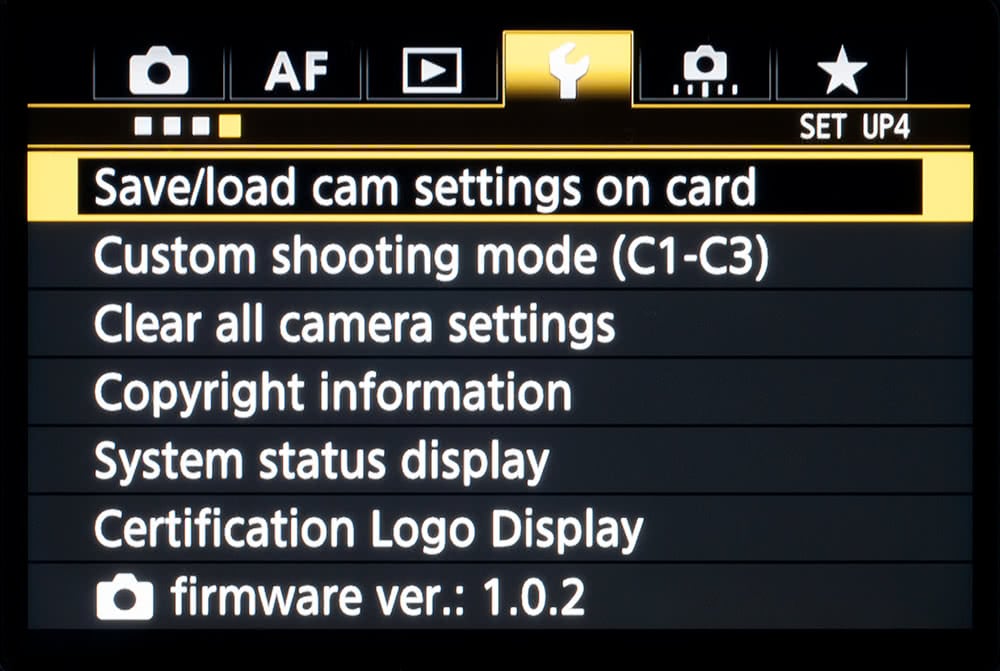
Save camera settings for Canon
With most Canon DSLRs, the option is also found under the Setup menu. Simply select the option and then choose to either Save or Load your settings.
Save camera settings for Sony
Once your camera is set up the way you want it, hit the Menu button. On the camera tab, select “Memory”. From here you can press the left and right buttons to select the location to save your settings. You can select 1, 2, or 3 for your camera’s internal memory, but if you really want to be safe, select M1, M2, M3, or M4 to save on your memory card.
Bear in mind that this will only save settings for the mode you’re in – Program, Manual, Aperture Priority etc. If you habitually shoot in multiple modes, you’ll want to save profiles for each one.
Save camera settings for Fujifilm
Modern Fujifilm cameras let you create up to seven different shooting profiles of saved settings. Press the MENU OK button, and navigate to IMAGE QUALITY SETTING. Select EDIT/SAVE CUSTOM SETTING and press MENU OK – this will bring up the seven custom settings.
The next step varies depending on your model of camera, but you should be able to select one of these profiles and hit SAVE CURRENT SETTINGS to record your camera’s current status.
However, this will only save the profile internally. If you want a backup of your camera settings, the best thing to do is download the Fujifilm X Acquire software for Windows or Mac. Download and install the software, then plug in your camera via USB.
Click the Fujifilm X Acquire icon in the menu bar (Mac) or taskbar (Windows), and you should see options to BACKUP CAMERA SETTINGS or RESTORE CAMERA SETTINGS.
Save camera settings for Panasonic
Panasonic cameras have a useful function that lets you use the Bluetooth connection to save your camera settings to a smartphone.
Connect the camera to your smartphone via Bluetooth. Tap Home, and then the wrench icon to get to Camera Settings Copy. Tap Save Setting – you may get a confirmation box at this point. Tap the Yes icon, and you’ll be good to go.
This mode also lets you transfer settings from one camera to another, which can be especially useful if you’re on a video shoot with multiple cameras and want to ensure things remain consistent.
Save camera settings for Olympus
Olympus cameras do not currently offer an easy, straightforward way to externally save your camera settings. There is a CUSTOM RESET function that lets you save profiles in-camera, which can be found in the first tab of the menu (camera icon).
In this section, you’ll see RESET 1 and RESET 2 options – these are custom reset profiles, which allow you to save specific settings and call them up at a moment’s notice.
IF your camera unexpectedly dies, a trip to a repair shop can be a lifesaver. At Fixation’s centres in London and Manchester we will always endeavour to diagnose the problem and fix it quickly to get your camera working again.
However, some issues with digital cameras will necessitate a full factory reset. If that happens, it pays to have your preferred settings backed up, whether to a memory card, a smartphone or the cloud. Taking the time to understand how to externally save and load your camera settings could pay dividends in the long run, and save you a major headache!
Alternatively, if your camera proves to be truly beyond repair, then it may be time to get a new one. Having your settings saved and ready to be restored can be a great way to hit the ground running with your new machine. While this will be easiest if you buy an identical body, settings can also potentially be imported between different models from the same manufacturer. Either way, it’s best to always be safe and back up your preferred settings regularly, ensuring that the latest versions of your settings are saved.
NB.If you update your camera’s firmware, you generally can’t restore your settings, as new features may have been added to your camera, so useful as it is, it’s not unfortunately foolproof!
Also, bear in mind that any firmware update will generally reset your customisation options.
When was the last time you cleaned your camera bag? A camera bag may seem unimportant, but it’s vital for protecting your valuable cameras and lenses. A good camera bag will be glued to a photographer’s hip on every trip, making their life easier and more manageable.
But what happens when the edges start to fray, the smell starts to build and the dust starts to accumulate? This is not only unpleasant, but also has the potential to damage your equipment. And that’s why you need to be cleaning your camera bag.
Ideally, you should do regular small cleans, and a deep clean every few months. In this blog we’ll quickly run through the best ways to do this.
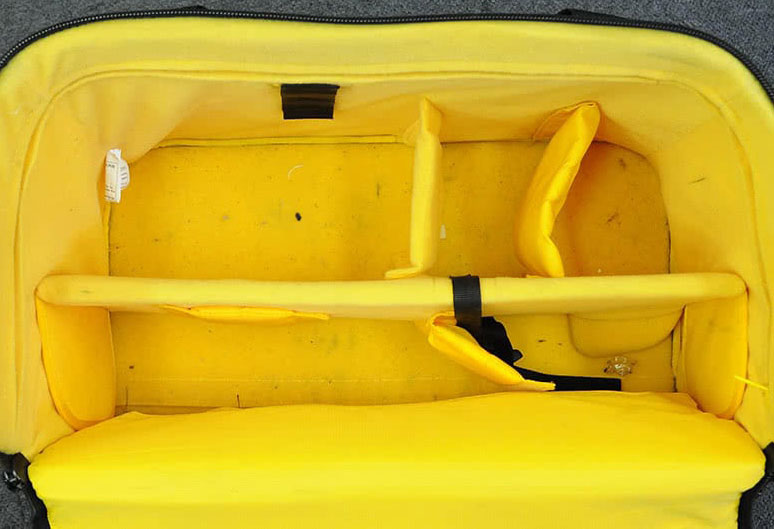
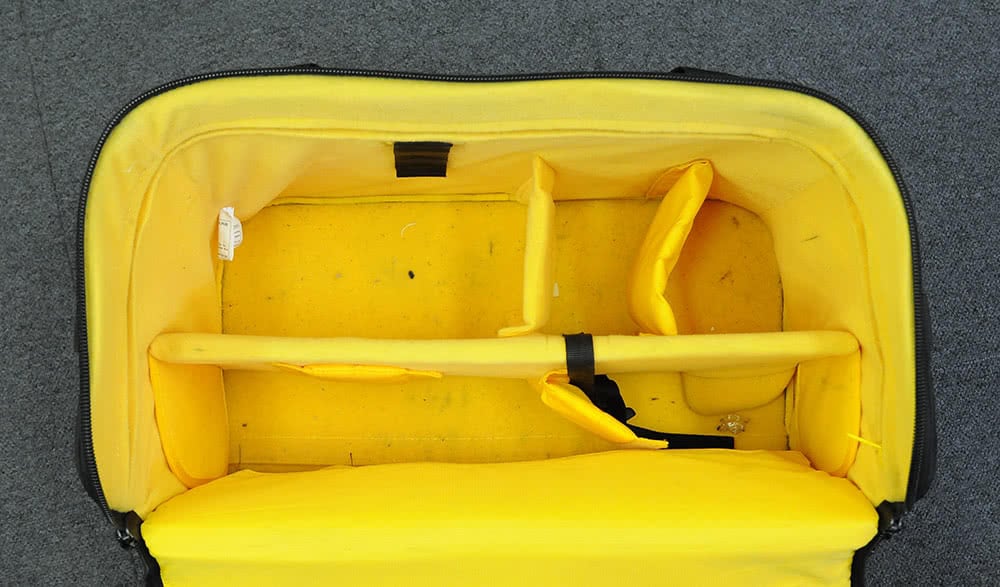
We see a lot of bags as dusty as this one!
Regular small cleans
First, it’s important to note that anytime you spill something on your bag, you should make sure to give it a quick wipe with a chemical-free and fragrance-free wet wipe or cloth. This will only take a few seconds, and will save you a lot more hassle later on by preventing the stain from settling in.
It’s up to you how often you do a small clean. It depends how often you’re using your bag, where you’re taking it and what kind of surroundings it’s being left in. If you’re doing daily trips to a sandy beach then it will probably need to be cleaned more often than if you’re going to the studio once a week. But we would recommend once every couple of outings.
First, remove everything from your bag (including the partitions!) and place all the contents in a safe space. We wouldn’t want that camera or lenses to be damaged on their adventure out of the bag.
Grab the vacuum cleaner and give the bag a good hoover all over, getting right into those dark and dusty corners. A lot of dust may have gathered in different pockets, so remember to open up any zippers and compartments and hoover inside those too.
If you don’t have a suitable hoover, then you can use a dry cleaning brush to dislodge any dirt and tip it out into a bin.
Your bag is now looking suitable for its next outing!
The big clean
As mentioned earlier, it’s optimal to do the deep clean of a bag every few months – maybe more often if you make frequent trips. But how best to go about deep cleaning your camera bag?
You may have heard that dumping your camera bag in the washing machine may do the job. But be careful! This may have a detrimental effect on your bag, or simply take forever to dry. It depends on the material of your bag. If a bag takes too long to dry, it increases the possibility of mould starting to form. If that happens, you’ll definitely be shopping for a new bag!
Specifics of cleaning can depend on the material – a nylon or cotton bag will need to be cleaned differently from a leather bag, for instance. However, a universally safe option – one that isn’t too strong and won’t do any damage – is to use warm, soapy water.
Again, do your quick clean. Empty your bag and vacuum the inside, use a cloth to brush away the dirt on the outside.
Mix some soap and warm water. Using a small cleaning brush (alternatively, a clean toothbrush), slowly go around the inside and outside of your bag, coating it with the soapy water mixture. Make sure to give extra attention to any stains or blemishes, and don’t forget to give any zippers a good clean too.
The next step is to use some clean warm water to wash away the soap. So repeat the previous step but with clean water. Clean any straps, handles and partitions with the same method.
When this is done, leave your camera bag in a safe, open place to air dry. Leave it open to prevent mustiness or any mould building up inside. Once it’s fully dry you can place the partitions back inside. That’s your deep clean done!
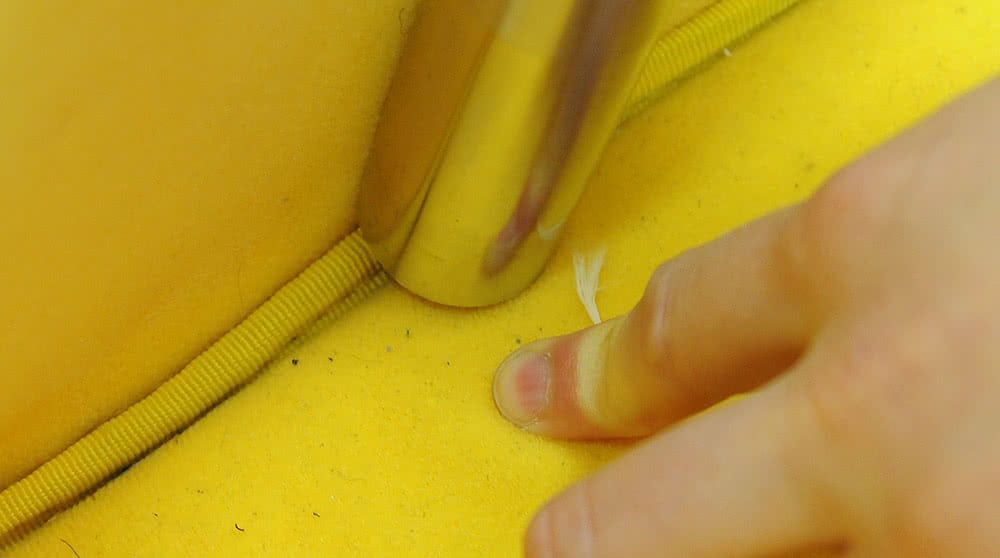
Lastly, here are a few bonus tips. Make sure you keep on top of trimming any loose threads! Not only do these look untidy, but they can also caught in the zippers. Also, get a rain cover for your bag! This won’t help in just protecting it from the rain, but may also protect it slightly from becoming dirty.
Key points
Do
Regularly wipe the outside and vacuum the inside of your camera bag.
Brush away the dirt on the outside of your bag with a cloth.
Use soapy water and clean warm water to give your bag a deep clean.
Remember to clean the zippers and trim any loose threads to keep your bag in good condition.
We’ve all been in that situation – your memory card is full and you have to quickly change cards without thinking.
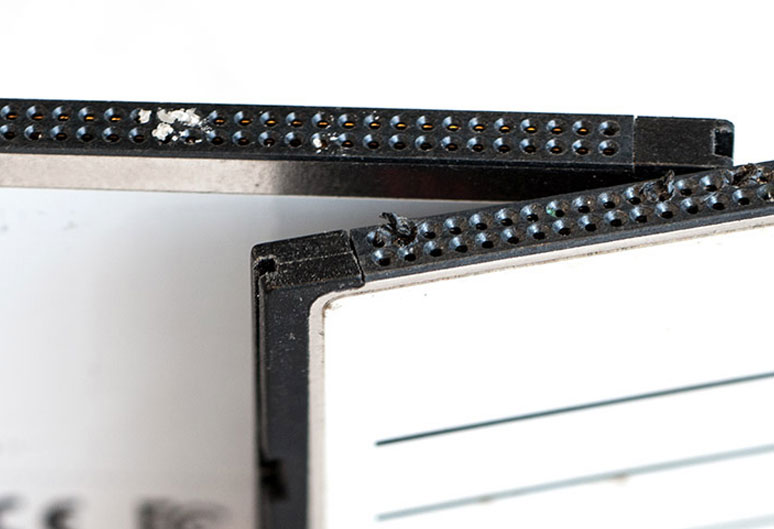
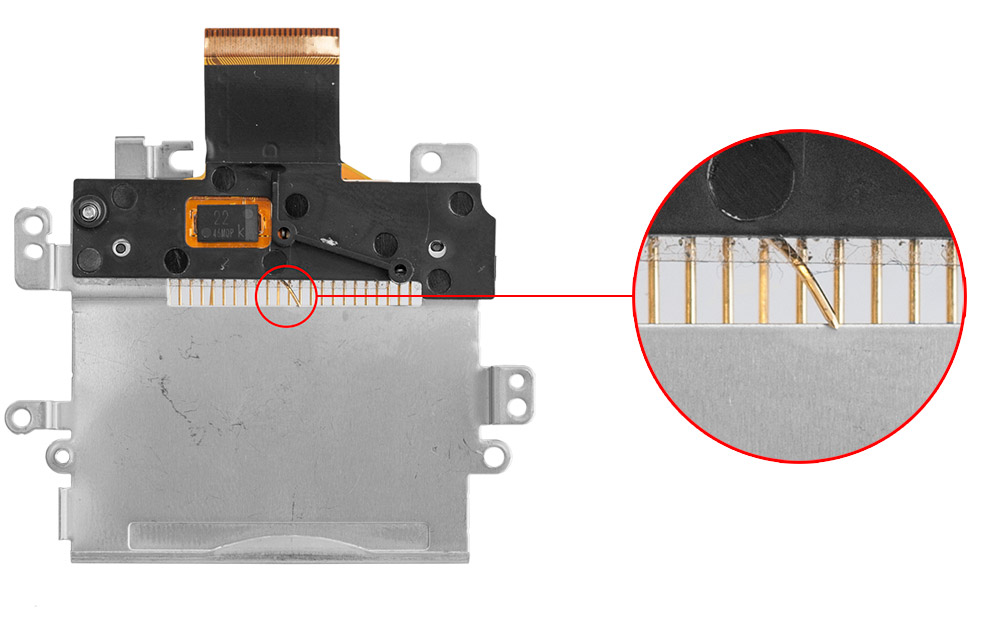
CompactFlash cards in particular have an awkward knack of almost fitting in the camera if inserted back to front, or even sideways, and the damage this can do is severe; the pins that interface with the card are easily bent, and once this happens, the CF reader unit needs to be replaced.
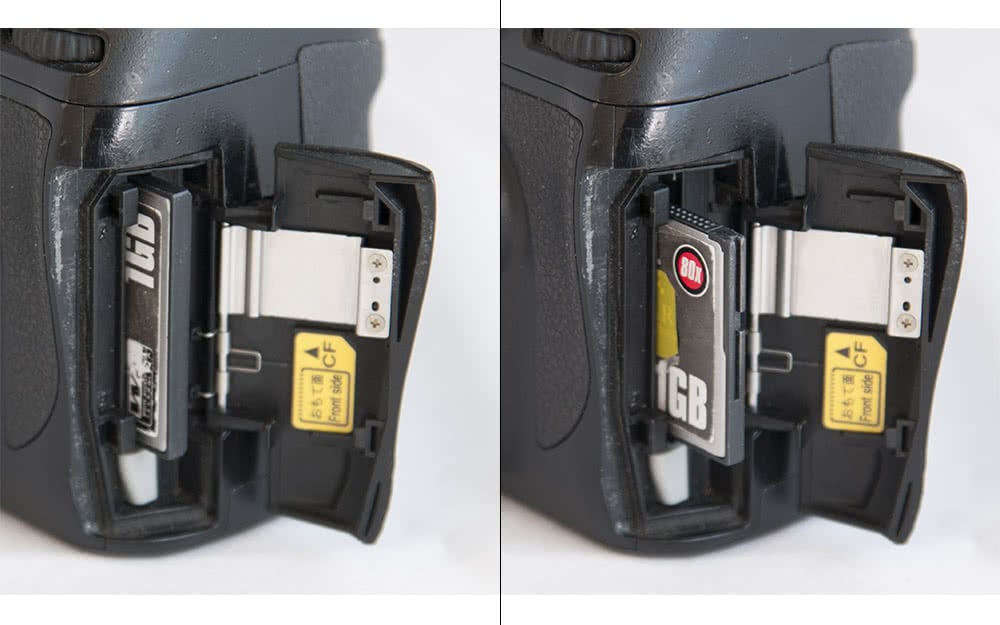
This D700 shows how easy it is to insert a card the wrong way.
We see cameras come in every week with bent pins and as well as the inconvenience of being without your camera for a few days while we replace the CF reader, the cost can be upwards of £150.
You only need to bend one pin to render your camera’s card reader unusable.
It’s also worth keeping a close eye on the card itself. If any of the holes on the card’s access port are blocked, this can also result in bent pins – even if the card is inserted carefully. And damage to the plastic sheath around the holes can also cause problems when the card is inserted.
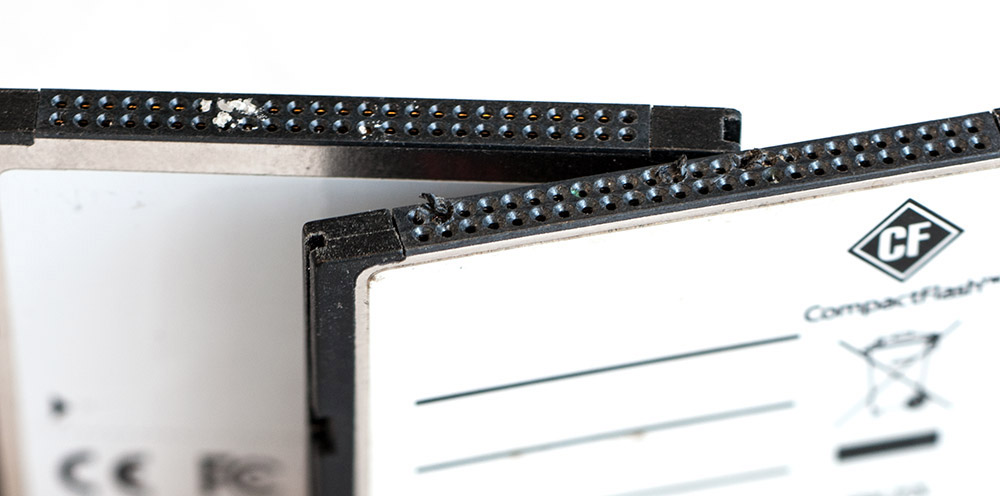
If your cards look like this, it’s time to replace them!.
So next time you’re organising your kit for a shoot, take a minute to inspect your cards using a loupe and remember to double check before you insert them in the camera. It could save you a small fortune.
We use cookies on our website to give you the most relevant experience by remembering your preferences and repeat visits. By clicking “Accept”, you consent to the use of all the cookies.
This website uses cookies to improve your experience while you navigate through the website. Out of these cookies, the cookies that are categorized as necessary are stored on your browser as they are essential for the working of basic functionalities of the website. We also use third-party cookies that help us analyze and understand how you use this website. These cookies will be stored in your browser only with your consent. You also have the option to opt-out of these cookies. But opting out of some of these cookies may have an effect on your browsing experience. We log visitor IP addresses and cookie preferences for due diligence reporting.
Necessary cookies are absolutely essential for the website to function properly. These cookies ensure basic functionalities and security features of the website, anonymously.
Advertisement cookies are used to provide visitors with relevant ads and marketing campaigns. These cookies track visitors across websites and collect information to provide customized ads.
Performance cookies are used to understand and analyze the key performance indexes of the website which helps in delivering a better user experience for the visitors.
Analytical cookies are used to understand how visitors interact with the website. These cookies help provide information on metrics the number of visitors, bounce rate, traffic source, etc.
Functional cookies help to perform certain functionalities like sharing the content of the website on social media platforms, collect feedbacks, and other third-party features.